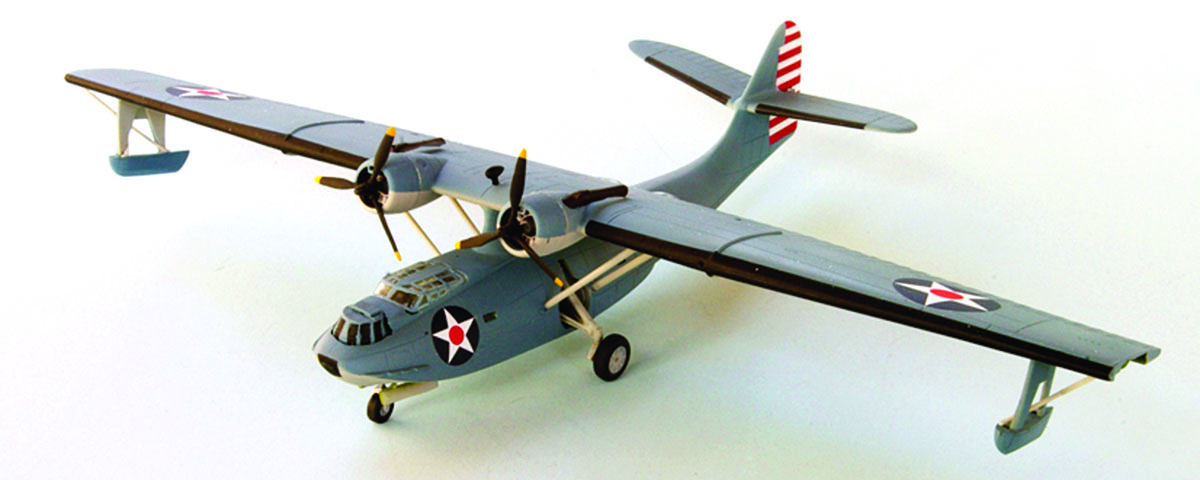
Kits of the Consolidated PBY-5/5A are produced in most popular scales. Since the flying boat is quite large in real life, so are most replicas—except for the Catalina produced by Minicraft Models in 1/144th scale. This diminutive model fits nicely on a bookshelf and conveys all the qualities of the real aircraft.
Start by painting the interior fuselage “interior green,” FS-34151. While the cockpit is small, you can add convincing detail by painting the crew’s seat cushions RAF dark green, then adding thin paper strips for lapbelts, brushed with flat white. The control columns should be aircraft interior black, FS-37031, with “leather” half-moon grips.
I scratch-built an instrument panel and painted it black, but didn’t detail it, since it cannot be seen once the fuselage sides are closed. The interior of the nose gun turret and blisters on the fuselage sides should be painted interior green, with gunmetal machine guns in their mounts.
Before closing the fuselage sides, locate and glue—from the inside—the left and right horizontal stabilizers. Note that careful work here will eliminate most filling and sanding for this area. Once the stabilizers have dried, close and cement the fuselage sides. On my kit these parts were slightly warped, so it was necessary to securely clamp the pieces together while the glue sets.
The wing section of the Catalina is perched on a pylon located slightly forward of the top center of the fuselage. Start construction with gluing the top and bottom wing sections together. Note that you may need to clamp these parts, since the outer sections have a slight tendency to warp. While the wing pieces are drying, paint the engine fronts Floquil “platinum mist” and then dry-brush them with black to bring out the cylinder details. Mask and spray the crankcase covers on the cylinder fronts with gloss light gray, FS-16440.
The underside portion of the wingtips contains the wells for the stabilizing floats that retract upward during flight. You’ll need to carefully position the tiny triangular pieces, A-19 and 20, in these wells, then cement them into place. Since there are no locating pins or indentations here, it’s necessary to dry fit the retracted struts into the wells and then “pencil in” their location. This area should eventually be painted interior green. Spray the inside of the engine cowlings flat black and tack them into position with white glue. They’ll be permanently attached later.
The PBY-5A amphibious version entered service in October 1941, and 802 were manufactured. Most appeared with flat gull gray, FS-36440, undersides and Navy blue gray, FS-35189, upper surfaces.
The model shown here is an example of an aircraft that served with Patrol Wing 2 in Hawaii in early 1942. A drawing of that Catalina appears in Bruno Pautigny’s book 60 Years of Combat Aircraft From World War One to the Vietnam War. Prior to the December 7, 1941, attack on Pearl Harbor, the rudders of some PBYs were painted white, with seven equally spaced red stripes. After you’ve completed the basic color scheme on your model, mask off the rudder and spray it insignia white, FS-17875. Using a pair of dividers, I calculated the width of the red stripes, then cut pieces from the red ScaleMaster sheet, SS-1, and applied the individual stripes. Before Pearl Harbor, the national insignia consisted of a dark blue disc with a centered white star and a red dot in the star’s center. I took the national insignia from an Expert’s Choice sheet, 48-44.
The landing gear wells on the PBY-5A were nestled into the fuselage; paint them interior green, silver or gull gray. Assemble the gear struts and fit them to the fuselage wells. The main and nose wheels should be “tire black.” Mask and paint the propellers black, with yellow, FS-13538, tips. Finally, paint the frames of the fuselage gun blisters and canopy greenhouse Navy blue gray, and your Catalina is ready for display.
Want to learn more about the Catalina? Read Cat Tales: Consolidated’s PBY Flying Boat by Stephan Wilkinson, from the May 2013 issue of Aviation History Magazine.


